
How to implement rate limiting with Redis
This post will show you how to implement rate limiting with Redis using two techniques: fixed time windows and sliding time windows.
I provide code samples, explain how they work, and discuss the advantages and disadvantages of each technique. The examples use Python, but the real discussion is around how to use Redis, and the methods are straightforward to transfer; there are good Redis clients for every popular language.
Rate limiting
Throttling is an integral part of running production services. Client requests are an unbounded input into your system, and they can topple your system if they cause too much load. A straightforward and effective way to track and throttle clients is to impose rate limiting. Limiting the number of requests protects the service and any services or databases it relies on, keeping everything within the range of usage you have tested and are willing to pay for.
There are many interesting throttling topics beyond rate limiting. What if we weighted different calls based on how taxing they were on our resources, where different queries cost the client a different number of credits? What is the best client-side retry logic we can add to our SDKs? How do you best dark-launch or simulate throttling to see how it would affect your current traffic patterns? How should cascading throttles work across layers in our multi-service architecture?
But simple rate limiting at the border is table stakes, and it's often all you'll need.
This should include more than a global rate limit. When you classify traffic and limit out-of-control clients individually, they won't be able to affect the rest of your customers. If you only have a global rate limit, even one bad actor could deny everyone access to your service. Typical traffic classification methods are source IP addresses, session cookies, user agents, customer accounts, and API keys. You can set different rates for reading vs. writing or specific rates for each API operation.
Having multiple layers of rate limiters is common. Anything with a public-facing service that requires authentication should have two rate limiters at the bare minimum. The first is a per-customer limit across all successful authentication cases, whether by session, account, or API key. That is what we will use in the examples below. The second protects against brute force authentication attempts, partitioning by at least source IP address.
Redis for rate limiting
Redis is a natural fit because it can sustain high call rates at a low expense and easily outpace what your border HTTP servers can handle. Of course, there are scenarios where you could scale out to hundreds of HTTP servers, beyond what a small Redis instance could handle, but you don't want to do that.
Two objections stand out. Redis is single-threaded, and it doesn't have the very best availability properties.
Regarding it being single-threaded, you end up vertically scaling as load increases (i.e., using a more powerful server). In most people's experience, it takes a very long time to outgrow CPU capacity (and outgrowing RAM will typically happen first). But you do have the option to deploy Redis as a cluster that will horizontally scale, and rate limiting is a workload that fits easily into that sharding scheme.
There is a great post on how Stripe transitioned to Redis Cluster to handle rate limiting their ever-increasing amount of API traffic.
Regarding availability, a managed solution like Amazon Elasticache is easy to set up for failover in the rare event there is a problem. If you are going for the highest scale and availability, you might not want to tolerate even a few seconds of downtime a year (a rare requirement). Or you may not like the consistency semantics of Redis Cluster during failover. It's not for every single use case.
If Redis is unavailable, some people decide to fail open (disable rate limiting) or fail closed (throttle everyone) and wait for it to return. There are options that take more work, for example, you can perform basic rate-limiting from in-memory data structures as a (less accurate) fallback, but that is a big tangent. Rate-limiting is also built into servers and proxies like Nginx and HAProxy; these are good places to keep global or per HTTP-server border limits that are enforced before a (more nuanced) call to Redis even comes into play.
First technique: fixed calls per minute
We will create a counter in Redis with a unique key for each client + the minute that we are currently in. We set a TTL on the key so that Redis will automatically remove them in the future.
Say we have API keys with an 8-character identifying component and a 32-character secret component. For the example key a34e15c0:810de1cbe7ef4c8eb7568d04bc3fdbc4, the identifying component is a34e15c0, and this identifies the customer for us. They've passed the authentication test we have in place, so we know a34e15c0 is legitimate and unique in our system. We will rate limit based on this string.
If you want fine-grained rate limiting, you could add more to it (for example, a34e15c0:POSTs, etc.).
The next thing we need is the current time. In a multi-server deployment, getting this from the local system clock introduces a problem because there could be clock drift across the servers. Even with NTP on a local cluster in place, where you can usually stay within the same millisecond across your servers, you still have a window for inaccuracy. A call could be attributed to the wrong minute.
Minor deviations here have always been OK in the projects I've worked on. This is likely OK for your use case, too. You could address clock drift by invoking the Redis TIME command and using the result (a multi-step operation probably implemented with Redis functions). This would be a consistent clock reading coming from the Redis node instead of each of your API servers, but it's likely overkill.
We ultimately want a string that will represent the current minute. You can use any representation you want as long as it is a consistent format across all the servers and it represents the current minute. Here we will retrieve the current time as Unix seconds from the epoch and 'floor' it to the minute.
In Python, you can get the current minute with a simple calculation:
import time
now = time.time()
minute = int(now // 60 * 60)

print(now)     # 1686323675.474017
print(minute)  # 1686323640
Here, any timestamp 1686323640 <= ts < 1686323700 will normalize to the same minute value 1686323640. This is the number of Unix seconds at 15:14:00 on this day. Anything with a timestamp of 15:14:00 to 15:14:59 will make it into the same "bucket" 15:14:00 (which we represent as 1686323640).
We'll use this bucket to do the counting. But we can't use the same one for every API client, because we keep a separate tally per client. So we qualify it using the identifying component we decided on above: a34e15c0.
client_code = "a34e15c0"
redis_key = f"{client_code}:{minute}"

print(redis_key)  # a34e15c0:1686323640
We use Redis for many different things, so let's add a prefix like rl (rate limiting) to ensure there aren't any conflicts across subsystems. In my projects, I create a single file of known prefix constants so that you can easily add and manage them without creating conflicts (I also use tenancy prefixes, but that is a long tangent).
client_code = "a34e15c0"
redis_key = f"rl:{client_code}:{minute}"

print(redis_key)  # rl:a34e15c0:1686323640
Alright, we have the Redis key to use.
As these examples are in Python, we've installed the Redis client. We created a function to get a connection (get_redis_connection()), but that setup is out of scope and will vary if you choose another client library.
But whatever language and client library you use, avoid creating a new connection every time you call Redis. A connection pool will perform much better.
Let's get to the actual counting. Each time there is a new API call to limit, use the INCR command and inspect the result. INCR will increment an integer by one. If the key doesn't exist, Redis will create it for you, start the counter at zero, increment it, and return one.
MAX_REQUESTS_PER_MINUTE = 60
r = get_redis_connection()

current = r.incr(redis_key)
print(current)  # 1

if current > MAX_REQUESTS_PER_MINUTE:
    raise Http429()
If the caller has exceeded the maximum requests for one minute, return a 429 Too Many Requests error or whatever is appropriate for your environment.
We need these values to be in Redis for a minute, give or take the slack we allow for clock drift across our servers. After time passes, we are done with them, and they should be deleted so that memory usage doesn't increase indefinitely. The EXPIRE command will handle this; Redis will automatically delete keys that live beyond the timeout you set.
One way to do this is to call EXPIRE every time you call INCR:
TIMEOUT_SECONDS = 120
pipe = r.pipeline()
result = pipe.incr(redis_key).\
            expire(redis_key, TIMEOUT_SECONDS).execute()

print(result)  # [2, True]

if result[0] > MAX_REQUESTS_PER_MINUTE:
    raise Http429()
A pipeline lets you batch work, send it in one request/response round trip to Redis, and get back a list of results from each command. The Python client we're using will even wrap it in a transaction by default. You can disable that (using r.pipeline(transaction=False)) as that consistency isn't that important here.
That seems like a lot of wasted calls to EXPIRE; another approach is to only call EXPIRE if you're the first to see this unique combination of minute and client_code.
TIMEOUT_SECONDS = 120
MAX_REQUESTS_PER_MINUTE = 60
r = get_redis_connection()

current = r.incr(redis_key)
print(current)  # 1

if current == 1:
    r.expire(redis_key, TIMEOUT_SECONDS)

if current > MAX_REQUESTS_PER_MINUTE:
    raise Http429()
You'd want to handle errors with EXPIRE better so that the 429 error is still returned.
That's it. That is the core of what you need to implement a fixed bucket per minute.
On top of making the throttling decision, we have helpful information for the client. You can add headers that tell them when it will be OK to make another API call and how many calls they currently have remaining. This isn't appropriate for many rate limiting use cases, but it is for regular, authenticated API calls.
Drawing on a real-world example, we'll implement the GitHub API rate limiting headers for our API. They use a fixed, per-hour bucket and include helpful headers about your current rate limiting state in every response, whether it was a successful call or throttled.
Assume a response object is in scope that you can add response headers to. And we'll strip out some of the extra lines from above to get to the point:
print(now)  # 1686323675.474017
print(minute)  # 1686323640
print(redis_key)  # rl:a34e15c0:1686323640
print(MAX_REQUESTS_PER_MINUTE)  # 60

current = r.incr(redis_key)
print(current)  # 5

delta = MAX_REQUESTS_PER_MINUTE - current
remaining = max(delta, 0)  # eliminate negative numbers
print(remaining)  # 55
response.add_header("x-ratelimit-remaining", str(remaining))

reset_at = minute + 60
print(reset_at)  # 1686323700
response.add_header("x-ratelimit-reset", str(reset_at))

if current > MAX_REQUESTS_PER_MINUTE:
    retry_after = int(reset_at - now)
    print(retry_after)  # 24
    response.add_header("Retry-After", str(retry_after))
    raise Http429()
The x-ratelimit-remaining header lets the caller know how many more calls they have in this period. Retry-After tells them how many seconds to wait until the next period when the quota resets.
The x-ratelimit-reset header is a timestamp in the future that indicates when the quota will be reset. Rather than using a Unix timestamp directly, like in the code above, converting it to comply with ISO 8601 and RFC 3339 is more common.
Alright, that's looking good. We can now limit clients to a certain number of calls per minute and give them helpful information in every response.
When you decide on what to use for MAX_REQUESTS_PER_MINUTE, note that you may see a burst of up to twice the rate in a short amount of time. In our example above, consider when the caller makes 60 successful calls in the final 5 seconds of a window and then 60 more successful calls in the first 5 seconds of the next window. You've now seen 120 successful requests over 10 seconds. To mitigate this, you can make each window shorter. But, read on for a different approach altogether.
Second technique: sliding window
Tracking with a sliding window means we will look into the past on every call. As time moves forward, the oldest items fall out of view and are not considered.
For this example, we'll use a five-minute window, which is 300 seconds. A client calls your API at timestamp 5000, and to make a decision, you look at the number of calls made between 4700 - 5000 (the last 300 seconds). The client calls your API again at timestamp 5100, and you consult the number of calls between 4800 - 5100. And so forth. This differs from the fixed time window in the first part of the post because each call gets its own custom window.
Why would we want to do this?
The main reason is to be friendlier about bursting without allowing it to constantly happen. We want to support cases where the client hasn't been calling the API recently and comes in with a burst of activity. It's like they've earned some credits, and we're OK with higher usage for a moment. Note that there are other ways to implement this, like the token bucket algorithm.
Let's compare the sliding window technique with our previous example of 60-second fixed windows with 60 calls per window. With our new technique, we will allow 300 calls in a sliding 300-second window.
Picture ten 60-second fixed windows, FW1 through FW10, starting at timestamp T-0 and ending 10 minutes later at timestamp T-600.
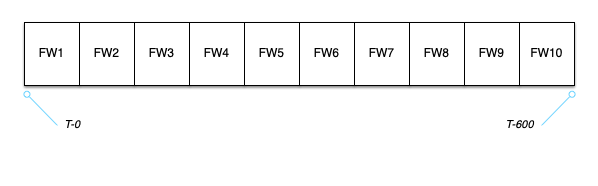
FW1 covers T-0 through T-59, FW2 covers T-60 through T-119, and so forth.
At T-150, halfway into our fixed window FW3, the client makes 150 calls to retrieve 150 files:
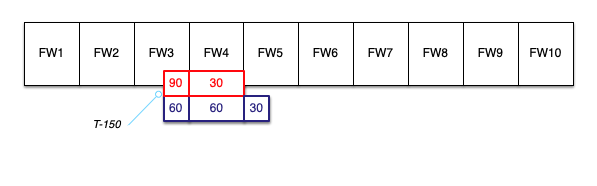
90 of those calls are rejected because they can only make 60 calls in each minute window, and the 60 calls allowed in FW3 were used up.
The client keeps calling, gets throttled, and manages to get 60 more successes during the FW4 window. The remaining 30 were rejected during FW4. They do make it into the FW5 window.
In the real world, they would have gotten many more throttles as they continued to try and continued to fail; clients can be unforgiving and not back off.
Now, say the client needs to process each file and then write something back to our API, all at a rate of one file per two seconds. So they need to make 150 more calls, they'll come at a fixed rate, and it will take 300 seconds from start to finish.
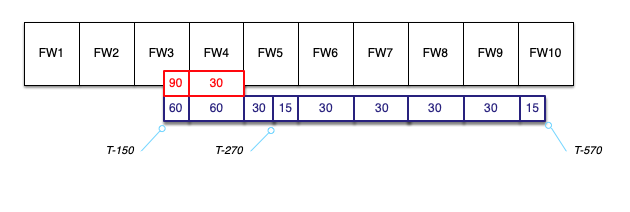
In our perfectly timed world, they'll begin this second phase of the work at T-270 and squeeze 15 calls into FW5. Then, 30 into FW6, 30 into FW7, and so on. The work is done at T-570, 300 seconds after T-270.
End to end, they started at T-150 and ended at T-570, getting the work done in exactly seven minutes.
With our sliding window, we decided we'll allow 300 calls in a sliding 300-second window.
When the first call comes at T-150, we will analyze all traffic from the last five minutes, from before T-0 to T-150. There wasn't any traffic, which means call will go through. The subsequent 149 calls will also go through. For each one, we will analyze calls in the previous five minutes, and for each one we will find that the total is below our 300 limit.
All 150 calls in the second phase of processing calls will go through, too.
Let's say the initial 150 fetches take 5 seconds. The client is then off and running on the second phase at T-155 instead of T-270:
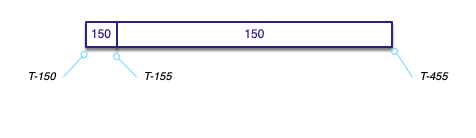
They finished 115 seconds earlier at T-455 with no errors.
We've made their experience much better because we could reason that they haven't called the API much recently.
An important aspect of the sliding window is that if they start calling the API constantly, they won't be able to burst. A sustained attempt to send too much traffic will settle into the same 60 calls per minute we got with the initial fixed window implementation. However, in the fixed window implementation, you might get 60 calls very quickly at each minute mark for a sustained caller. This time, it has the potential to be a much smoother curve.
Being able to support both types of client behavior well is a significant advantage. The disadvantages are that the implementation requires more Redis commands per call, and it's harder to figure out good headers to send in the responses.
The x-ratelimit-remaining header is easy to calculate, but the client will need to think more about the meaning of the time period for that. And you would not even use x-ratelimit-reset because that is not the same concept anymore. You could come up with a scheme for Retry-After, but it is more complex.
Saving the most fun for last, now we get to implement the sliding window with Redis.
Our key is whatever entity you want to throttle. This time, it won't include a timestamp.
key = "rl:a34e15c0"We said our sliding window will be 300 seconds:
window = 300The maximum number of events that can occur in this sliding window is 300:
max_events = 300We'll make a function and call it with those three parameters.
def is_throttled(key, window, max_events):
    key = str(key).strip()
    if not len(key):
        raise ValueError("key is empty")
    if window < 1:
        raise ValueError("window must be 1 second or more")
    if max_events < 1:
        raise ValueError("max_events must be 1 or more")

    ts = time.time()
    print(ts)  # 1686321868.775908

    start_ts = ts - window
    print(start_ts)  # 1686321568.775908

    expiration = window + 10
    print(expiration)  # 310

    r = get_redis_connection()
    pipe = r.pipeline()

    results = pipe.zadd(key, {ts: ts}).\
                zremrangebyscore(key, 0, start_ts).\
                    zcard(key).\
                        expire(key, expiration).execute()

    count = int(results[2])
    return count > max_events
Lines 2-8 are sanity-checking the parameters.
Like before, line 10 is getting the current time, with microsecond precision.
The start_ts value on line 13 is the beginning of the range where we will look for events. If our window size is 300 seconds, we look for events from 300 seconds ago until now. From start_ts to ts.
The expiration value on line 16 is like before: we will make sure the key expires in Redis if we stop using it.
On lines 19-20, we get a client from the connection pool and set up a pipeline. Like before, we will use the pipeline to run multiple commands with just one request/response cycle to and from Redis.
Finally, we get to the action in lines 22-25. We are going to use sorted sets. Sorted sets are a collection of unique strings ordered by a score you assign them. They're sorted by the score you assign to each element, and there are unique entries (i.e., a set).
Our approach is to create one record per call, assign the timestamp as each record's score, and constantly "prune" the set to only include records in a particular score range equal to our rolling window. After pruning them, we count the number of records in that range, and that's our result.
If you are thinking in SQL terms, this would be similar to adding a row per call, deleting all older rows outside the timestamp range we care about, and executing a COUNT. I would not recommend implementing it that way 😊. Redis has specialized commands for this and is orders of magnitude faster.
The ZADD command on line 22 adds a new entry to the sorted set for our key. If it doesn't exist yet, Redis will create it. The score we assign is the timestamp (1686355568.775908), and the value is the same. We never need to consult the value; we use this because the data structure requires it be something unique. The timestamp in microseconds is not actually guaranteed to be unique, but we decide we can tolerate conflicts because of how rarely they will occur in practice.
This is a danger zone. If you are scoring with whole seconds like 1686355568, and you use that for the value, you will have a lot of conflicts across a large fleet of servers handling requests, even when scoped to one API key. This a set, so using ZADD with a duplicate value will overwrite an older record. Each record represents one call; if you replace a current record, the call is not counted as a new one. The more conflicts you have, the less accurate the rate limiting will be.
If you generate a unique request ID for every call, that is a good candidate to use instead. It's a pity that we don't even need this data structure to have unique values, it's just a detail we need to understand about sorted sets in Redis.
In line 23, we do the "pruning." The ZREMRANGEBYSCORE command will remove all records with scores in the provided range. We give it a range from zero to the start_ts value. That range is inclusive, so you may want to subtract .000001 from start_ts to be pedantic. In practice, a one-microsecond difference across a five minute time window is not consequential.
Now that the set only contains records inside our sliding time window, we use the ZCARD command to count how many records exist.
Finally, we need to set the TTL on every call with EXPIRE because calls could be few and far between. Each call must be included in all future sliding windows in the next 300 seconds, so the TTL needs to be refreshed for each call. The expiration should be at least as long as the window; in the example code above, there is a 10-second buffer to avoid edge cases.
That took more work to understand and implement than the first example, but I find it elegant and a hands-off way to improve the client experience in many cases.
As you get into domains with very high call rates, like network packets or database calls, you will likely need to research different approaches (start with the token bucket algorithm and the generic cell rate algorithm).
But if you have a normal service and no rate limiting in place, either of the techniques in this post is a great addition to protect your service, your customers, and your sleep. Hat's off for adding rate limiting. 🎉
To the extent possible under law, I have dedicated all copyright and related and neighboring rights to code snippets in this post to the public domain worldwide. This software is distributed without any warranty. See CC0 1.0. The text remains under the site license, linked below.